In this example we will connect a HDC1000 sensor to a data logging shield and log out the temperature and humidity to a csv file on an SD card
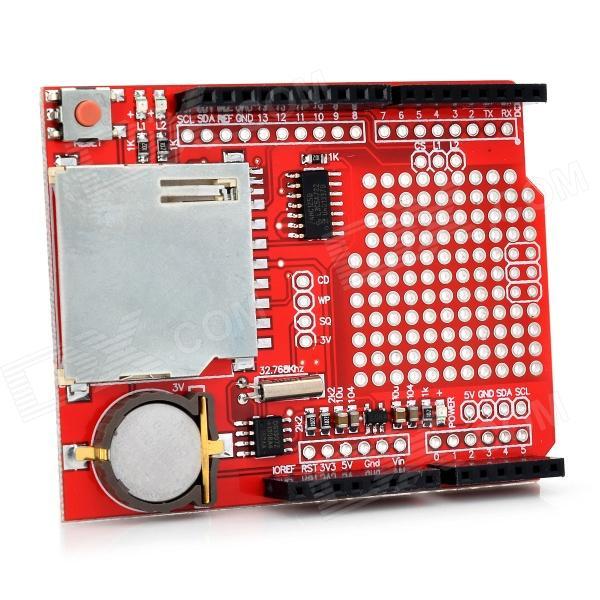
Here is a picture of the Arduino logging shield
The HDC1000 is a digital humidity sensor with integrated temperature sensor that provides excellent measurement accuracy at very low power. The device measures humidity based on a novel capacitive sensor. The humidity and temperature sensors are factory calibrated.
The sensing element of the HDC1000 is placed on the bottom part of the device, which makes the HDC1000 more robust against dirt, dust, and other environmental contaminants. The HDC1000 is functional within the full –40°C to +125°C temperature range.
Key Features
Relative Humidity (RH) Operating Range 0% to 100%
14 Bit Measurement Resolution
Relative Humidity Accuracy ±3%
Temperature Accuracy ±0.2°C
Supply Voltage 3 V to 5 V
I2C Interface
Connection information
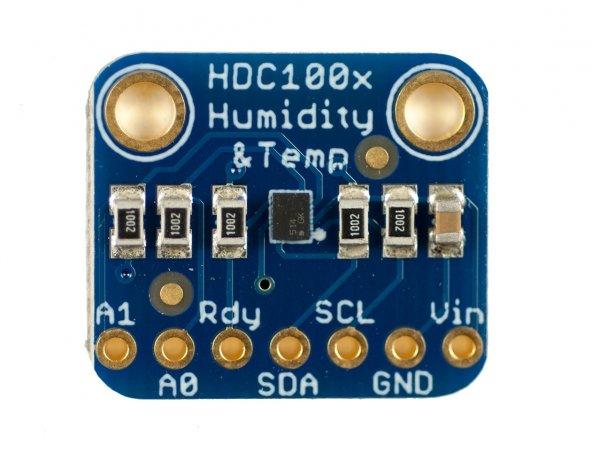
The easiest way is to purchase some sort of breakout and connect it to the data logging shield, here is the module
Connect Vin to 5VDC
Connect GND to ground
Connect SCL to A5 on data logging shield
Connect SDA to A4 on data logging shield
Code
The good folks at Adafruit have done the hard work and produced a library for this device – https://github.com/adafruit/Adafruit_HDC1000_Library . If you are using Arduino IDE 1.6.5 or later you can easily import this library by going to Sketch -> Include Library -> Manage Libraries
[codesyntax lang=”cpp”]
#include <Wire.h>
#include “Adafruit_HDC1000.h”
#include <SPI.h>
#include <SD.h>
#include “RTClib.h”
RTC_DS1307 RTC;
Adafruit_HDC1000 hdc = Adafruit_HDC1000();
File myFile;
const int chipSelect = 10;
void setup()
{
Wire.begin();
Serial.begin(9600);
RTC.begin();
//sd setup
if (!SD.begin(chipSelect))
{
Serial.println(“initialization failed!”);
return;
}
Serial.println(“initialization complete.”);
//temp sensor setup
if (!hdc.begin())
{
Serial.println(“Couldn’t find sensor!”);
while (1);
}
//RTC setup
if (! RTC.isrunning())
{
Serial.println(“RTC is NOT running!”);
// following line sets the RTC to the date & time this sketch was compiled
RTC.adjust(DateTime(__DATE__, __TIME__));
}
}
void loop()
{
DateTime now = RTC.now();
//create a file
File myFile = SD.open(“HDC1000.csv”, FILE_WRITE);
//write to file
if (myFile)
{
Serial.print(“Writing to HDC1000.csv…”);
//date and time section
if(now.hour() <10)
{
myFile.print(“0”);
}
myFile.print(now.hour());
myFile.print(“:”);
if(now.minute() < 10)
{
myFile.print(“0”);
}
myFile.print(now.minute());
myFile.print(“:”);
if(now.second() < 10)
{
myFile.print(“0”);
}
myFile.print(now.second());
myFile.print(“,”);
//sensor section
myFile.print(hdc.readTemperature());
myFile.print(“,”);
myFile.print(hdc.readHumidity());
myFile.println();
//close the file
myFile.close();
Serial.println(“done.”);
}
else
{
Serial.println(“error opening HDC1000.csv file”);
}
delay(1000);
}
[/codesyntax]
Results
Open the serial monitor window and you will see something like this
initialization complete.
Writing to HDC1000.csv…done.
Writing to HDC1000.csv…done.
Writing to HDC1000.csv…done.
Writing to HDC1000.csv…done.
Writing to HDC1000.csv…done.
Writing to HDC1000.csv…done.
Writing to HDC1000.csv…done.
Remove the sd card and open the HDC1000.csv file and you should see something like this
12:12:36,23.45,29.17
12:12:39,23.45,29.08
12:12:40,23.46,29.08
12:12:41,23.46,29.08
12:12:42,23.49,29.08
12:12:43,23.47,29.08
12:12:44,23.47,28.98
Links
Data Logger Module Logging Data Recorder Shield for Arduino UNO SD Card
Adafruit HDC1008 Temperature & Humidity Sensor Breakout Board


